source: https://medium.com/@rsaeedbiz/how-to-create-an-offline-apt-mirror-ubuntu-focused-980e5d022337
In the course of one’s career as an IT professional, there may arise a need to implement an airgap on the entire network or a specific segment. In such instances, APT-enabled Linux machines will be unable to pull packages from the APT repository. In this article I will go over the steps to create your own local APT repository mirror.
Drawing from my experience as a DSO engineer, I have found this knowledge to be extraordinarily useful. I have encountered situations where I need to set up such a solution multiple times, each time having different requirements and policies that need to be adhered to.
System Requirements/Notes:
Minimum system requirements: 1 domain joined VM/physical host with 350GB — 800GB+ disk space (this is dependent on how many repository components you mirror, e.g. if you just mirror main & universe 450GB will suffice. If you’re unsure of what you need to mirror go as large as you possibly can), 4GB RAM, and 1 CPU. This host also needs to be running a Linux distro that uses APT, in this tutorial I will be using Ubuntu 20.04.
NOTE: This host will need an internet connection while you are setting it up, there are two ways you can approach this based on the standards you must be in compliance with:
(1) you can setup this host with internet connectivity and keep this host internet connected after setup, this will ensure the machine can update itself regularly. Given that the host serves as a mirror, the air-gapped machines relying on it will not have direct internet access; only the mirror host will possess this privilege. I have found this solution to be in compliance with many different standards/domain policies.
(2) In instances where the aforementioned solution is deemed non-compliant with existing policies, an alternative involves setting up the APT mirror on a non-domain-joined, internet-enabled machine. After the setup is complete, we then migrate it to the air-gapped, domain-joined host. While effective, this approach usually requires ongoing manual updates to the mirror (for updated packages, new packages, security patches, etc.). For guidance on migrating to and updating an air-gapped APT-mirror host, please refer to my guide on the subject. ___in progress___…
Background Information:
To start off, we need to learn some information about the APT repository, this will assist you with the deployment and understanding of this solution.
APT repository components:
The APT repository is split into 4 main repository components, these are: main, restricted, universe, and multiverse; and two supplementary repos: updates, and security.
- Main Repository: Comprises core packages officially endorsed by the distribution. These packages are thoroughly tested and considered stable.
- Restricted Repository: Hosts proprietary software packages supported by the distribution, potentially with licensing restrictions or limited redistribution permissions.
- Universe Repository: Consists of community-maintained packages not officially supported by the distribution. These undergo testing of lower rigor compared to the main repository.
- Multiverse Repository: Contains packages not open source, may have legal or patent restrictions. Lacks official support and may involve certain risks.
- -Updates Repository: Supplementary repo component that provides updates for packages in the main repository, addressing security vulnerabilities and bugs.
- -Security Repository: Supplementary repo component that focuses on security updates, offering patches to address vulnerabilities in packages.
Knowing what each of these repository components are will help you determine exactly what to mirror so you can make your deployment as lightweight as possible.
Solution deployment process:
Step 1- On your clean mirror host start by running this command to update & upgrade the internal packages: sudo apt-get -y update && sudo apt-get -y upgrade
Step 2- Now run this command on the mirror host, this command installs the apt-mirror package that you will use to perform the mirror process: sudo apt-get install apt-mirror
Step 3- Now you need to choose a place for the mirror directory, usually APT stores the package .deb files in var/cache/apt/archives so I like to make a directory near this folder to keep everything together, but you can make it anywhere you want. Make a directory anywhere you want or run this command to make the directory where I do (this tutorial uses my path as the default location, so running this command will make it easier on your end): sudo mkdir /var/cache/apt/APT-MIRROR
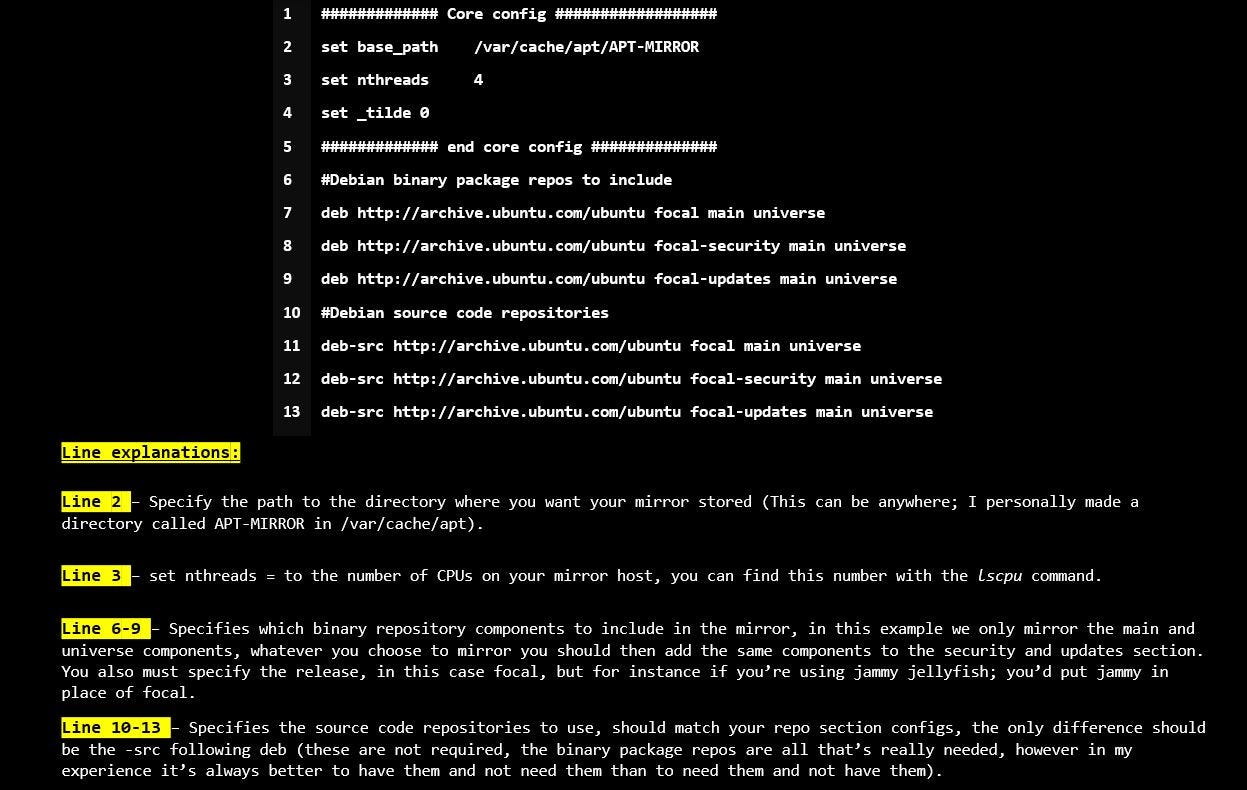
Step 4- Now use this command: sudo nano /etc/apt/mirror.list to edit the mirror list file that apt-mirror creates, this file will tell apt-mirror what repos you’d like to mirror and what you’d like to exclude. Once inside the editor, modify the file to look like the below example, read the line-by-line explanation to modify it for your use case:
Step 5- On you’ve finished configuring the file move on to this step, this is an extremely important one, this deployment will not be successful without it. APT-mirror is no longer a maintained package in the universe repository, all the package components are functional with the exception of the core script, you will have to download an updated & maintained version of the core Perl script to make it work. Follow the 3 steps below to accomplish this:
(1) Download the maintained file from this repo (←that’s the repo I’ve always used, and I’ve never had a problem with it, but even that one is a little out of date; if you have issues with that file here’s another repo that may be more current). You can download it however you like, but the file that you need is the apt-mirror file:

My process is usually to just download the repo as zip on a different computer, unzip it, and SCP the file over to my mirror host, but if you have git on your mirror host you can just clone the repo.
(2) Now run this command on the mirror host (this command creates a backup of the old apt-mirror file, and then removes it) : sudo cp /usr/bin/apt-mirror /usr/bin/apt-mirror.original && sudo rm /usr/bin/apt-mirror
(3) Now change the permissions of the copied apt-mirror file & copy the file you pulled from the repo to /usr/bin, ensure it’s named apt-mirror, to accomplish this you can use a command like: sudo cp /location/of/copied/filename /usr/bin/apt-mirror && sudo chmod +777 /usr/bin/apt-mirror
The core apt-mirror script should now be updated.
Step 6- Now use this command: sudo apt-mirror to begin the mirroring process, this will probably take between 2–6 hours depending on how much RAM and the number of CPUs in your mirror host
Step 7- Once the apt-mirror process has completed you need to serve the repository using a web server, you can use Apache or NGINX, this tutorial will show you how to use NGINX. Start by running this command to download the nginx package and its dependencies: sudo apt-get install nginx after this command completes run this command: sudo systemctl enable nginx
Step 8- Use this command to edit the nginx default available site file: sudo nano /etc/nginx/sites-available/default When you open the editor modify the file to look like the below (replacing the alias path with the path to your mirror directory)

Step 9- After you save the default config file use this command: sudo ufw allow 80/tcp && sudo systemctl restart nginx to expose port 80 and to restart the nginx server, once restarted navigate to http://Mirror-host_IP-Address/apt-mirror
If all the above steps were executed correctly you should now see the mirror directory served.
Step 10- The Final Step in this process is to set up machines to use the local mirror, on each host that needs to use this mirror run this command to edit the apt sources list: sudo nano /etc/apt/sources.list
Once in the editor set up the file like the below example, ensure that you input the same repos that you mirrored (for instance here im only putting focal main and universe because I only put focal main and universe in my mirror.list file in step 4):

Finally, after you save the file run this command: sudo apt update to update the package list, the machines configured using the above steps should all be able to reach the offline mirror and update properly. To double check run something like apt-get install net-tools. If these machines are air-gapped they shouldn’t have been able run any apt-get commands before the file was configured, now these commands should succeed.
Final notes:
NOTE: If you set up a machine to use this repo and docker is preventing apt-get update or apt-get upgrade from running do the following:
- run this command: ls /etc/apt/sources.list.d
- if you see one or both of these files: docker.list OR docker.list.save , use a text editor and comment out the docker repository line from each file (you really only need to do this for docker.list but to be safe do both). After that is done you should be good to go.
Leave a Reply